
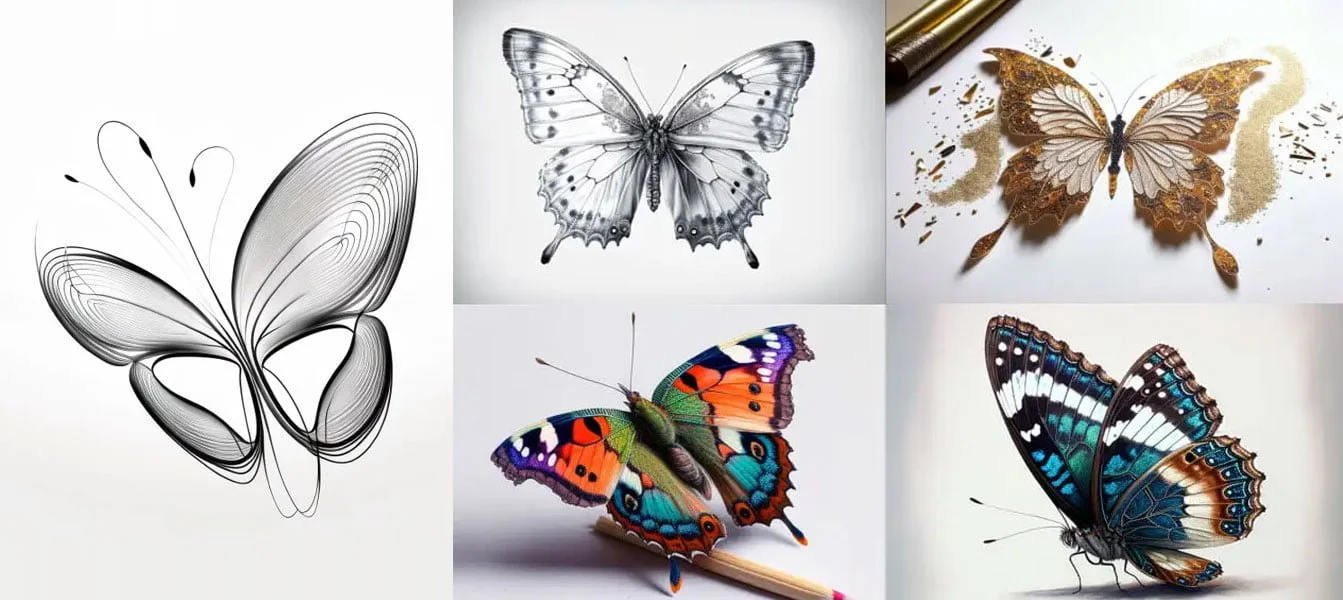
Sketch:q5pbirjjkfa= butterfly drawing have captured the imagination of artists, nature lovers, and scientists alike for centuries. With their ethereal beauty, vibrant colors, and intricate wing patterns, butterflies have become a popular subject for drawings, paintings, and other forms of artistic expression. Whether you are an amateur or an experienced artist, sketching a butterfly offers a unique opportunity to explore the delicate symmetry, fine details, and colorful hues that make these creatures so enchanting.
The term sketch:q5pbirjjkfa= butterfly drawing may point to a specific method, toolset, or art style that emphasizes the sketching process for drawing butterflies. In this detailed guide, we will dive into the world of butterfly drawings, covering everything from basic anatomy to advanced coloring techniques, ensuring that by the end, you have all the knowledge and tools to create a stunning butterfly drawing.
Butterfly Anatomy and Symmetry
Before putting pencil to paper, it’s essential to develop a good understanding of the anatomy of a butterfly. Although they may seem simple, their bodies contain complex elements that are necessary to capture if you’re aiming for a lifelike representation. When it comes to sketch:q5pbirjjkfa= butterfly drawing, precision and symmetry are key.
The body of a butterfly can be broken down into three main sections:
- Head: The butterfly’s head is small, featuring the eyes, antennae, and proboscis (the feeding tube). The eyes are large in proportion to the head and are typically represented as large circles in simplified sketches. The antennae, which extend from the top of the head, are long and thin, ending in small knobs.
- Thorax: The thorax is the middle part of the body, connecting the head and abdomen. This is where the butterfly’s legs and wings attach. The thorax is generally small and compact, so artists often draw it as an oval or slightly elongated circle.
- Abdomen: The abdomen is the long, segmented portion of the butterfly’s body. It tapers down as it extends from the thorax, and its segmented appearance is an important detail to capture in your drawing.
Sketch:q5pbirjjkfa= butterfly drawing wings are among the most important elements to get right. Not only are they the most prominent part of the insect’s body, but their symmetrical design and intricate patterns are what give the butterfly its unique appearance.
- Forewings and Hindwings: A butterfly has two forewings and two hindwings. The forewings are larger and more triangular in shape, while the hindwings are smaller and more rounded. While drawing, it is important to maintain the correct proportions between these wings. To ensure that the left and right sides of the butterfly are symmetrical, you can use guidelines to mirror the shape of each wing.
Step-by-Step Guide to Creating the Perfect Butterfly Outline
Now that you have a better understanding of sketch:q5pbirjjkfa= butterfly drawing anatomy, it’s time to start sketching the outline. Creating a well-proportioned, symmetrical outline is crucial for laying the foundation of your butterfly drawing. Follow these steps to get started.
Step 1: Set up the Canvas with a Guideline To make sure your sketch:q5pbirjjkfa= butterfly drawing sketch is symmetrical, begin by drawing a vertical line down the center of your canvas or paper. This line will serve as your reference point for drawing both sides of the butterfly evenly. If you prefer digital drawing tools, you can use symmetry tools in programs like Adobe Illustrator, Photoshop, or Procreate to automatically mirror your lines on both sides.
Step 2: Sketch the Butterfly’s Body Start by sketching the butterfly’s body in the center of the guideline. Draw the head as a small circle, followed by the thorax, which can be represented as a small oval directly below the head. Finally, extend the abdomen downward, drawing it as a long, tapered shape that ends in a point. Be sure to add lines for the segments of the abdomen, which gives it its insect-like appearance.
Step 3: Draw the Forewings Once the body is complete, it’s time to move on to the wings. The forewings are larger than the hindwings and extend upward and outward from the thorax. Begin by drawing a curved line extending from the top of the thorax for the upper edge of the forewing. Then, draw a second curved line beneath it to complete the forewing’s outer edge. Remember to ensure that both forewings are symmetrical using the centerline as a guide.
Step 4: Add the Hindwings Next, sketch:q5pbirjjkfa= butterfly drawing the hindwings, which are slightly smaller and more rounded than the forewings. They extend outward from the bottom of the thorax and curve downward toward the lower part of the butterfly’s body. Be sure to maintain symmetry between the left and right hindwings by constantly checking your drawing against the guideline.
Mastering Wing Patterns
A butterfly’s wings are its most distinctive feature, with countless variations in shape, pattern, and color. While some butterflies have simple patterns with minimal variation, others display intricate designs that require attention to detail. Mastering the art of sketch:q5pbirjjkfa= butterfly drawing wing patterns is an essential skill for any artist who wants to capture the true essence of a butterfly.
Understanding Basic Patterns
Most butterfly wings are composed of a combination of veins and larger pattern elements like spots, bands, or streaks. These veins not only provide structural support to the wings but also create natural divisions for the various colors and patterns.
Start by sketch:q5pbirjjkfa= butterfly drawing the wing veins as delicate lines radiating outward from the thorax. These veins create compartments within the wings, which you can fill with patterns. Some common wing patterns include:
- Circles or Eye Spots: Many butterflies, such as the Peacock Butterfly, feature large circular patterns that resemble eyes on their wings. These spots are typically placed near the outer edges of the wings and can be shaded in darker colors or decorated with concentric rings of different hues.
- Bands and Stripes: Bands and stripes are commonly seen on species like the Monarch Butterfly, where the wings are crossed with bold black and orange bands. To replicate these patterns, use smooth, flowing lines to create contrast between the colors.
- Fractal Patterns: Some butterflies have incredibly intricate, almost fractal-like patterns, where small shapes repeat and radiate outward from the center of the wing. You can create these designs by drawing smaller, repeating shapes inside the wing compartments, gradually increasing the level of detail as you go.
Creating Symmetry in Patterns
Butterflies are known for their symmetrical wings, so when sketch:q5pbirjjkfa= butterfly drawing wing patterns, it’s important to replicate the design on both sides as accurately as possible. If you’re drawing freehand, constantly refer back to your guideline to make sure the placement of spots, veins, and shapes mirrors across both wings. In digital art, symmetry tools can save a lot of time, allowing you to draw one side while automatically replicating it on the other.
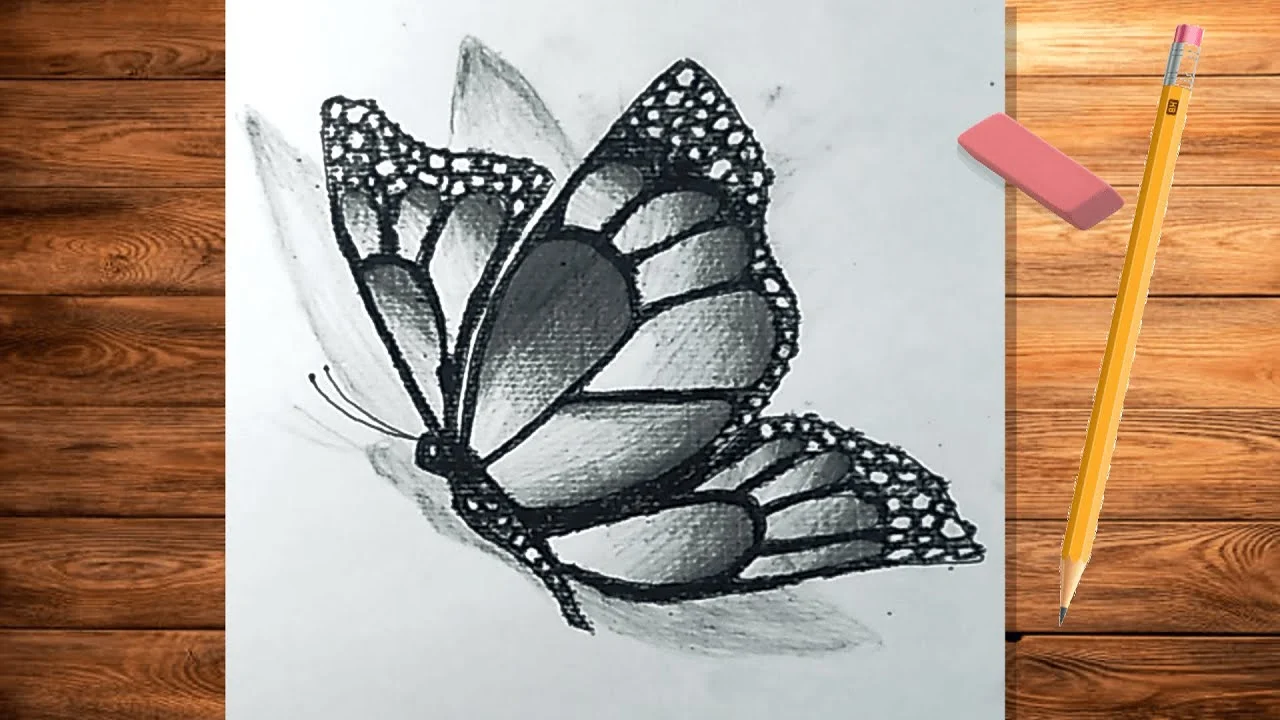
Techniques for Realistic Shading and Texturing
Once the outline and wing patterns are complete, shading and texturing are the next steps to bring your butterfly drawing to life. Shading adds depth to the butterfly, making it appear more three-dimensional, while texturing adds realism by representing the unique surfaces of the sketch:q5pbirjjkfa= butterfly drawing wings and body.
Shading Techniques
To start shading your butterfly, first decide on the direction of the light source in your sketch:q5pbirjjkfa= butterfly drawing. For example, if you imagine the light is coming from the upper right corner of the page, the left side of the butterfly will be in shadow, while the right side will be more illuminated. Always keep your light source consistent throughout the drawing to avoid unnatural-looking shadows.
When shading the body, use smooth, gradual transitions from light to dark by applying light pressure with your pencil or digital brush. This will help create a soft, realistic look. The thorax and abdomen should have gentle shadows along the underside, with highlights on the top where the light hits.
For the wings, shading is a bit more subtle. Butterfly wings are usually delicate and flat, so the shading should be lighter, with only minimal contrast between the light and dark areas. The areas near the veins or toward the edges of the wings may have slightly more shadow, while the center of the wings remains lighter. Use a soft pencil or digital brush to achieve this effect.
Texturing Techniques
Sketch:q5pbirjjkfa= butterfly drawing wings are covered in tiny scales that give them their vibrant colors and slightly iridescent appearance. To represent this in your drawing, you can use a combination of stippling (small dots) and fine cross-hatching. Stippling is particularly useful for adding texture to the surface of the wings, while cross-hatching can create subtle shading without overpowering the delicate patterns.
For the body, texturing can be achieved by adding short, curved lines to mimic the fine hairs that cover the thorax and abdomen of many butterflies. Pay close attention to the natural direction of these hairs, ensuring that they follow the curves of the body.
Advanced Coloring Techniques for Butterfly Wings
Coloring your butterfly is where you can truly bring the sketch to life. Butterflies are famous for their vivid, diverse color palettes, which range from soft pastels to bold, saturated hues. To achieve a realistic or strikingly beautiful butterfly, follow these tips for applying color to your sketch:q5pbirjjkfa= butterfly drawing.
Choosing the Right Colors
The color choices for your butterfly will largely depend on whether you are sketch:q5pbirjjkfa= butterfly drawing a real species or creating a fantastical butterfly from your imagination. For a realistic drawing, observe reference images of the butterfly species you want to depict. Pay close attention to the gradient transitions between colors and the specific tones present in the wing patterns.
For imaginative butterflies, feel free to experiment with unexpected color combinations. For example, you might combine shades of blue and green for a cool-toned butterfly or blend pinks and oranges for a warm, sunset-inspired palette.
Layering Colors for Depth
Achieving depth in your butterfly’s colors requires a technique known as layering. Start by laying down the base colors of the wings using light, even strokes. Then, gradually build up darker shades in areas where shadows would naturally fall, such as near the veins or along the edges of the wings. Finally, use a blending tool (or a soft brush in digital sketch:q5pbirjjkfa= butterfly drawing) to blend the colors smoothly, creating a seamless transition between the light and dark areas.
For a more vibrant effect, try using complementary colors to make certain areas of the wings pop. For example, placing a bright yellow next to a deep purple will create a striking contrast, drawing attention to specific parts of the butterfly.
Adding Highlights and Gloss
To give your sketch:q5pbirjjkfa= butterfly drawing wings a more lifelike, glossy appearance, use white pencils or a soft eraser to add highlights to the areas where the light hits. These highlights should be applied sparingly, focusing on the edges of the wings or near the top of the forewings. If you’re working digitally, you can use a soft, low-opacity brush to gently apply highlights, making the wings appear to shimmer.
Creative Exploration: Abstract and Surreal Butterfly Art
While realistic sketch:q5pbirjjkfa= butterfly drawing are beautiful and rewarding, you can also explore more abstract or surreal styles of butterfly art. In abstract drawings, the focus shifts from accurately depicting the butterfly’s anatomy to playing with shapes, colors, and patterns in new and unexpected ways. Surreal butterfly art, on the other hand, combines elements of fantasy and dream-like imagery to create butterflies that exist beyond the realm of reality.
Abstract Butterfly Art
In abstract sketch:q5pbirjjkfa= butterfly drawing, you can take creative liberties with the symmetry, proportions, and patterns of the butterfly. For instance, you might choose to exaggerate the size of the wings, giving them long, flowing shapes that stretch across the page. Alternatively, you could simplify the butterfly’s body into geometric forms, focusing more on the relationship between shapes and colors than on anatomical accuracy.
Abstract art allows you to experiment with unconventional color schemes as well. You could fill the wings with vibrant, clashing colors, or limit your palette to just black and white, focusing on contrast and composition. The key to abstract art is embracing spontaneity and seeing where your imagination takes you.
Surreal Butterfly Art
In surreal butterfly art, butterflies are often combined with other elements to create dream-like, fantastical imagery. For example, you could draw a butterfly with wings that blend into a starry sky, or one whose wings are made of delicate leaves instead of feathers. Surrealism encourages the artist to think outside the box and explore concepts that challenge the viewer’s perception of reality.
Incorporating human elements into your surrealsketch:q5pbirjjkfa= butterfly drawing can also create powerful visual metaphors. For example, you might draw a butterfly emerging from a cocoon shaped like a human heart, symbolizing transformation and growth. Or, you could depict a butterfly whose wings are made of mirrors, reflecting the world around it.
Avoiding Common Butterfly Drawing Mistakes
As with any form of art, there are a few common mistakes that can arise when sketch:q5pbirjjkfa= butterfly drawing. By being aware of these pitfalls, you can avoid them and ensure that your drawing turns out beautifully.
Mistake 1: Lack of Symmetry
One of the most common mistakes in sketch:q5pbirjjkfa= butterfly drawing is failing to maintain symmetry between the left and right wings. Because butterflies are perfectly symmetrical, even small discrepancies between the wings can make your drawing look unbalanced. To avoid this, use a guideline or symmetry tool, and constantly compare both sides as you draw.
Mistake 2: Overcomplicating Patterns
While butterfly wings are naturally intricate, it’s easy to go overboard with details and make the patterns too complicated. Instead of getting lost in the minutiae, focus on the major shapes and patterns first, then gradually add smaller details as needed. Remember, simplicity can sometimes be more effective than complexity.
Mistake 3: Flat Shading
Another common mistake is using flat shading, which can make your sketch:q5pbirjjkfa= butterfly drawing look two-dimensional. To avoid this, always consider the direction of the light source and use gradual shading to create a sense of depth. Blend your shadows and highlights smoothly for a more realistic effect.
Mistake 4: Incorrect Proportions
When sketch:q5pbirjjkfa= butterfly drawing, it’s important to keep the proportions between the body and wings consistent. If the wings are too small or the body is too large, the butterfly will look unbalanced. Use reference images to guide your proportions, and make sure the forewings and hindwings are the correct size relative to the body.
Finalizing Your Drawing: From Sketch to Masterpiece
After you’ve completed your sketch:q5pbirjjkfa= butterfly drawing, take some time to review it with a critical eye. Ask yourself whether the anatomy looks accurate, whether the wings are symmetrical, and whether the shading and patterns add depth and realism to the drawing.
If you’re satisfied with your sketch:q5pbirjjkfa= butterfly drawing, you can finalize it by adding any final touches, such as refining the outlines, adding more texture to the wings, or deepening the shadows. If you’re working with traditional media, consider inking over your pencil lines to make the drawing look cleaner and more polished.
Finally, consider framing your butterfly drawing or turning it into a digital file for prints. Butterflies make for stunning wall art, and a carefully rendered drawing can be a beautiful addition to your home or studio.
Essential Tools for Butterfly Drawing
Exploring Butterfly Variations in Art
Throughout history, butterflies have appeared in art across different cultures and artistic movements. Their symbolic associations with transformation, freedom, and beauty have made them a popular subject for painters, illustrators, and sculptors alike.
Butterflies in Renaissance Art
During the Renaissance, butterflies often appeared in paintings as symbols of the soul or resurrection. For example, butterflies were sometimes depicted alongside Christian imagery, representing the idea of spiritual transformation and eternal life.
Butterflies in Japanese Art
In traditional Japanese art, butterflies are associated with joy, beauty, and the ephemerality of life. Artists often depicted butterflies in delicate ink paintings or woodblock prints, capturing their fleeting beauty in intricate detail.
Butterflies in Contemporary Art
Today, butterflies continue to inspire artists in various forms of media. From large-scale butterfly installations to hyper-realistic butterfly tattoos, the butterfly remains a versatile and timeless subject in the world of contemporary art.
Inspiration from Butterfly Symbolism in Different Cultures
Butterflies hold different meanings in cultures around the world, and incorporating these symbolic elements into your sketch:q5pbirjjkfa= butterfly drawing can add an extra layer of depth and meaning to your work.
In Greek Mythology
In Greek mythology, the butterfly is associated with the soul. The ancient Greeks believed that the soul left the body in the form of a butterfly after death, symbolizing the soul’s journey to the afterlife.
In Native American Culture
For many Native American tribes, butterflies are symbols of transformation and change. The butterfly’s metamorphosis from caterpillar to adult represents personal growth, renewal, and the ability to embrace change.
In Chinese Culture
In Chinese folklore, butterflies are seen as symbols of love and marriage. Two butterflies flying together are thought to represent a happy couple, and butterfly motifs are often used in wedding decorations or traditional clothing.
In Celtic Traditions
In Celtic traditions, butterflies are associated with rebirth and the cyclical nature of life. The butterfly’s short life span and transformation process represent the constant cycle of life, death, and rebirth.
By incorporating these symbolic meanings into your sketch:q5pbirjjkfa= butterfly drawing, you can create art that not only looks beautiful but also carries a deeper message or personal significance.
Sketch:q5pbirjjkfa= Butterfly Drawing: Conclusion
Sketch:q5pbirjjkfa= butterfly drawing whether realistic, abstract, or surreal, offers a wide range of artistic possibilities. From understanding butterfly anatomy to mastering wing patterns, shading techniques, and advanced coloring, this guide has covered the essential steps to create stunning butterfly art. Whether you’re inspired by nature or exploring your creativity through abstract forms, the butterfly is a subject that allows you to express your artistic vision in countless ways.
So, grab your pencils, pens, or digital tools, and let your imagination take flight as you embark on your journey to mastering the art of butterfly drawing. With practice, patience, and attention to detail, you can create sketch:q5pbirjjkfa= butterfly drawing that are not only beautiful but also meaningful, capturing the essence of one of nature’s most captivating creatures.

Crafting Daily Lifestyle Narratives Across News and Business Horizons
Meet Joseph Tucker, a versatile blogger who navigates the intricate landscapes of lifestyle, news, business, and beyond. With a keen eye for detail and a passion for diverse niches, Joseph’s blogs are a testament to his ability to seamlessly blend lifestyle insights with the latest news and business trends. Whether offering practical lifestyle tips, dissecting current events, or unraveling the dynamics of the business world, Joseph’s writing invites readers to explore a rich tapestry of topics, where every blog post adds a new layer to our understanding of modern living. Mail: [email protected]